Snapper CL15 in Linux 2.6.34
Posted in Software News on June 16, 2010 by Administrator
The 2.6.34 release of the mainline Linux kernel now includes support for Bluewater Systems . Support is included for the Ethernet, frame buffer, NAND flash and I2C peripherals, with support for the SPI bus and I2S audio expected to be merged in the next few releases.
Other code which has been committed to the mainline Linux kernel by Bluewater Systems includes:
- Driver for the SST25L SPI flash
- Driver for the DS2782 battery gas-gauge
- Generic GPIO support for the AT91 ARM processors, which is used by our , and the upcoming 9G45 modules.
Tags: None
Read More
Leave a Comment •
Trackback
Embedded Bluetooth
Posted in Software News on May 25, 2010 by Administrator
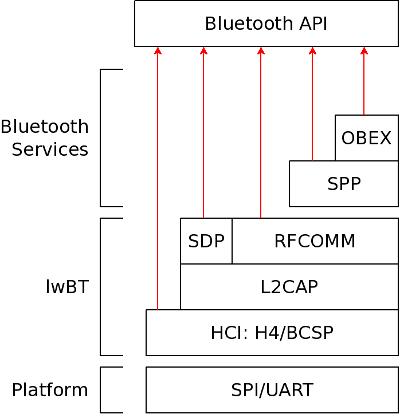
We have recently been working on a project which involved implementing a Bluetooth stack on an ARM Cortex M3 micro, with only 48kB of memory and 256kB of flash. We chose to use the Light-weight Bluetooth library (lwBT), which is a small, cross platform, Bluetooth library designed for embedded environments.
The lwBT library provides basic functionality for the , L2CAP, SDP and Bluetooth layers. Additionaly, we implemented an OBEX layer with support for pushing files to remote devices and providing an OBEX push profile to allow files to be received from other Bluetooth devices. We also implemented a basic serial port profile (SPP) on top of the RFCOMM layer in lwBT which provides wireless serial communication. This can be used, for example, with the standard Linux BlueZ RFCOMM serial utilities. The entire lwBT stack fits in under 24kB of flash storage and uses between 5 and 10kB of memory depending on configuration options.
The lwBT stack provides a lot of the core Bluetooth functionality, but the interface to the library is very raw. Our Bluetooth API provides a set of simple access functions for common tasks such as sending and receiving data over an RFCOMM link and pushing files to other devices via OBEX. Our Bluetooth library was also designed to be as platform independent as possible. Only a thin platform specific layer must be written in order to move the Bluetooth library to a new device.
The following diagram shows the structure of the Bluetooth stack provided by our library:
Tags: None
Read More
Leave a Comment •
Trackback
The magic of the EDID
Posted in Software News on May 23, 2010 by Administrator
A common use of our (OMAP3530) technology is to display digital video content on standard televisions or computer monitors. It is a fairly trival task to attach a DVI/HDMI transmitter to the RGB output of the OMAP3530 to provide a very versatile digital video solution. The trick is to detect what resolutions and frequencies are supported by the connected television. Luckily there is a standard for this.
The Display Data Channel (DDC) is a protocol that can be used to control a display/monitor via a two wire physical link. DDC is found on most recent computer monitors and is also part of the HDMI cable specification. The most common version of DDC is actually implemented as a standard I2C bus. A DDC compliant display acts as an I2C slave and allows available resolutions and settings to be requested over the bus.
The Extended Display Identification Data (EDID) is a data structure that describes information about the display. It is this structure that can be read over the DDC and is specified by the Video Electronics Standards Association (VESA). The most commonly used version is v1.3 and it is this version that is used by HDMI compliant devices.
Given most embedded devices have I2C busses, it is a trival task to connect to the DDC of an HDMI connector. So once you have a working I2C bus, reading the EDID is as simple as reading 128 bytes at I2C address 0x50. The "parse-edid" application which is part of the "read-edid" opensource package can be used to parse the binary blob that is the EDID to something that is human readable.
Critical to most embedded applications is parsing the supported resolutions. Unfortunately the information in the standard EDID is not always enough to make these decisions. This information is usually stored in "extension" blocks that are stored after the standard 128 byte EDID. Each extension block is of type audio, video, vendor specific or speaker. Each video extension block contains a supported resolution and suitable refresh frequencies.
While connecting off the shelf displays to embedded devices can by a very quick way to add large display capablilties, the reality is that most televisions and monitors are quite specific about the resolutions and refresh rates the need to operate at. Hence to properly support consumer displays, the DDC channel and EDID parsing must be implemented on the embedded device and resolution and pixel clock set accordingly.
Tags: None
Read More
Leave a Comment •
Trackback
Java on Quickstart Kit
Posted in Software News on August 06, 2009 by Administrator
Java applications are platform independent. This means that a Java class file can be run on either a desktop PC or an embedded ARM platform without needing to be recompiled. This can reduce development time greatly since an application can be developed on a standard desktop PC and then re-deployed on an embedded ARM platform with little or no extra effort. The main page for embedded Java development is: http://java.sun.com/javase/embedded/. Java SE 6 is unfortunately only supported on ARM v6 or higher. However, Java 1.4.2 is supported on our ARM v5 based Quickstart Kit. Sun are expecting to release a version of Java SE 6 with support for ARM v5 processors by the end of August. The embedded version of Java 1.4.2 is only 25MB when installed and can run on devices with as little as 32MB of memory. The embedded Java version of Java 1.4.2 is a full J2SE implementation except that it is "headless", which means that there is no support for mice, keyboards or framebuffer devices. To download the Java 1.4.2 run-time for use on Bluewater's Quickstart Kit:
- Go to http://java.sun.com/javase/downloads/embedded.jsp
- Under "Java SE for Embedded 1.4.2", "ARM Linux - Headless" select "EABI, glibc 2.4, Soft Float"
- Fill out the survey and provide an email address
- You will be sent an email with a link to a download
- Download the archive
- The archive can be installed by simply unpacking it to a convenient location (for example, /local/java)
To create a simple hello world application, creae a file called Hello.Java with the following contents:
public class Hello {
public static void main(String args[]) {
System.out.println("Hello World from Java on the Quickstart Kit");
}
}
To compile this you need to have the Java SDK installed on your PC. The file Hello.class can be built as follows:
javac Hello.java
You can then run this on either your PC, or on Bluewater's Quickstart Kit. On the Quickstart Kit you will need to supply a classpath which includes both the Java installation directory and the path for your hello world class file. For example, if you have the embedded ARM Java run-time installed in /local/java, and your Hello.class file in is /home/ryan/java then you can run it as follows:
java -classpath /local/java/lib:/home/ryan/java Hello
If all goes well, you should see the output of the hello world program.
Tags: Quickstart Kit, Java
Read More
Leave a Comment •
Trackback